Custom Markers
In the WebGIS Viewer, results are marked with a blue marker by default. In some cases, however, a different symbol should be used.
General Approach
The display of markers is controlled via the webgis.markerIcons object in the WebGIS API. This array contains predefined markers that are addressed via keys.
Example:
A predefined marker for the current position:
this.markerIcons["currentpos_red"] = {
    url: function () {
        return webgis.css.imgResource('position_red.png', 'markers')
    },
    size: [38, 38],
    anchor: [19, 19],
    popupAnchor: [0, -20]
};
Properties of a Marker Object
Property |
Description |
|---|---|
|
A function that returns the URL of the marker image. If "http://myserver.com/markers/mein_marker.png"
|
|
The size of the marker in pixels. |
|
The coordinates of the insertion point in the image (from the left, top) in pixels. |
|
The coordinates of the info bubble relative to the insertion point of the marker in pixels. |
Note
Marker attributes such as size or insertion point can also be defined as functions, if dynamic adjustments are required.
Markers for Query Results
The markers for query results are defined as follows:
this.markerIcons["query_result"]["default"] = {
    url: function (index, feature) {
        return webgis.css.imgResource('marker_blue.png', 'markers');
    },
    size: function (index, feature) { return [25, 41]; },
    anchor: function (index, feature) { return [12, 42]; },
    popupAnchor: function (index, feature) { return [0, -42]; }
};
The following applies here:
query_result: defines markers for query results.default: used when there is no special definition for a specific query.Size and insertion point as functions: unlike static values, these are calculated dynamically.
Function parameters:
Parameter |
Description |
|---|---|
|
Sequential number of the search result for which the marker is loaded. |
|
The feature object in GeoJSON format, for which the marker is shown. |
These parameters are passed in the example, but not used. By default, the same marker is always set for all results.
Overriding Markers
If a page accesses the WebGIS API, marker properties can be overridden after the file api.min.js has loaded. The syntax corresponds to the standard definition, but this cannot be used. Instead, access is done directly via webgis.
Example: a custom marker with its own symbol:
webgis.markerIcons["currentpos_red"] = {
    url: function () {
        return "http://myserver.com/markers/mein_super_marker_symbol.png"
    },
    size: [20, 20],
    anchor: [9, 9],
    popupAnchor: [0, -10]
};
Warning
The markerIcons array cannot be addressed with this, and access must be done directly via webgis.markerIcons.
Markers in custom.js
The first value overridden in the custom.js file is the default marker for query results.
Example: here, instead of the simple blue marker, a blue marker with a number is shown for each query result.
webgis.markerIcons["query_result"]["default"] = {
    url: function (i, f) {
        return webgis.css.imgResource('marker_blue_' + (i + 1) + '.png', 'markers');
    },
    size: function (i, f) { return [25, 41]; },
    anchor: function (i, f) { return [12, 42]; },
    popupAnchor: function (i, f) { return [0, -42]; }
};
. The number corresponds to the index of the search result.
How it works:
The marker is loaded from the file
marker_blue_i.pngin the markers folder, whereistands for the index of the query result (starting at 0).To make the numbering start at
1,(i + 1)is used:The available marker files are located in the directory:
portal5/content/api/img/markers.Files with the names marker_blue_1.png, marker_blue_2.png, …, marker_blue_1000.png exist there.
'marker_blue_' + (i + 1) + '.png', 'markers'
The result of this change looks as follows:
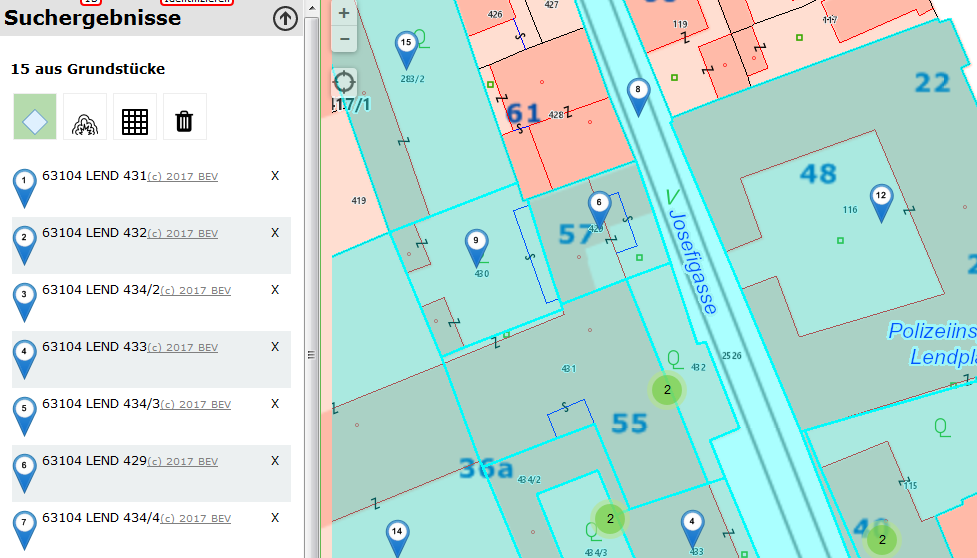
The markers get a sequential number, which is very practical for the user, since it allows a visual match between the list and the map. The next example applies exclusively to the gemeinden query:
webgis.markerIcons["query_result"]["gemeinden"] = {
    url: function (i, f) {
        if (f.properties.Gemeinde == "Graz")
            return webgis.css.imgResource('marker_circle_sketch_vertex_99.png', 'markers');
        return webgis.css.imgResource('marker_circle_sketch_vertex_' + (i + 1) + '.png', 'markers');
    },
    size: function (i, f) { return [21, 21]; },
    anchor: function (i, f) { return [11, 11]; },
    popupAnchor: function (i, f) { return [0, -11]; }
};
Here, too, a round marker with a sequential number is used. However, here the attributes of the queried feature are accessed directly. In the example, a feature for which the Gemeinde attribute equals Graz is assigned a fixed marker with the number 99.
Tip
Ice hockey fans know why the number 99 was chosen.
All other functions do not depend on the index or the feature, since all markers are the same size and have the same insertion point. If this is not the case, you could also query the feature in these functions and, if necessary, return different values. An example of an assignment based on feature properties could, for example, be a medical facilities topic. In that case, different markers could be used for doctors, hospitals, pharmacies, etc.
The result from this example would look roughly like this:
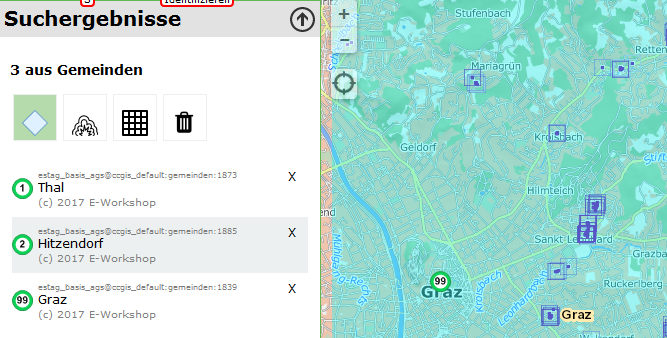
The following examples no longer concern the markers themselves, but the display of the result list. In this list, only a preview with a few attributes is always shown. These attributes correspond to the first three attributes that can be searched for this topic. WebGIS assumes that these attributes are meaningful for a preview. If a different display is desired, this can be implemented with the following examples:
webgis.hooks["query_result_feature"]["grundstuecke"] = function (map, $parent, feature, base) {
    base(map, $parent, feature);
    webgis.$("<a style='color:gray;font-size:.9em' href='http://bev.gv.at' target='_blank'>(c) 2017 BEV</a>").appendTo($parent);
};
The hook is called when a result is rendered for the preview. The map, the parent HTML element, the feature, and the original/default function are passed. In the example, the original function is called first, to perform the rendering as usual:
base(map, $parent, feature);
This function is passed the same parameters – except for base itself. Afterwards, a link to BEV with a copyright notice is simply added. The result corresponds to the screenshot above with the blue markers. In the list, the link is visible in gray behind each result. Of course, it could also be placed on a new line.
Tip
This method is particularly useful when there are no meaningful attributes available for a preview for a query.
An example of this is a topic with construction-site photos that can be queried on the map using the identify function. A field Preview is set in the CMS with an ImageExpression pointing to the image. To show this image in the preview, the following code can be used:
webgis.hooks["query_result_feature"]["enetze_fotos"] = function (map, $parent, feature, base) {
    $(feature.properties.Vorschau).appendTo($parent);
};
Here, the base function is no longer called; instead, the image is inserted directly. The result looks as follows:
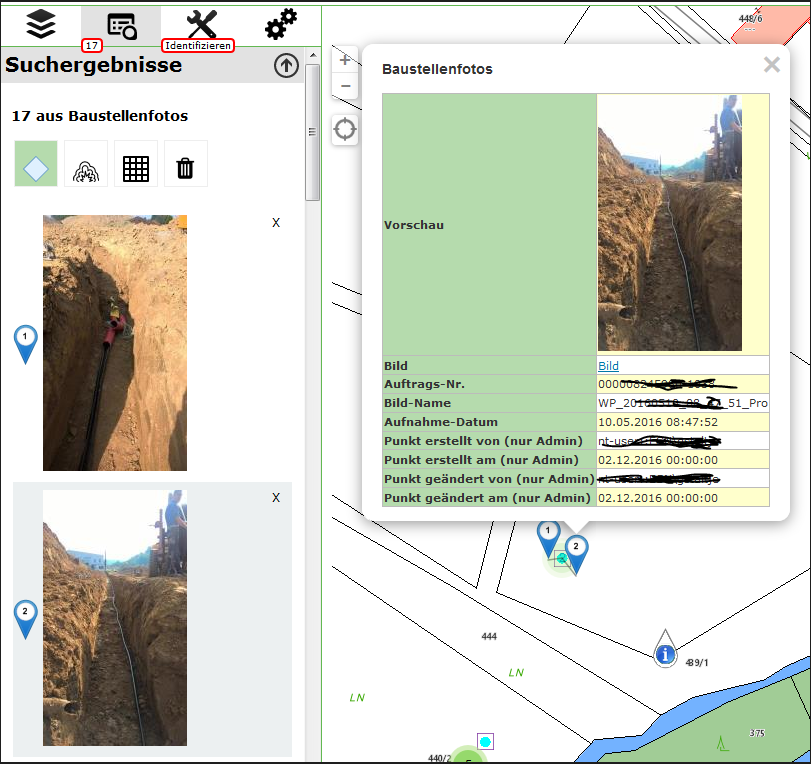
The images appear directly in the preview of the search results. Clicking on a photo shows the corresponding marker popup on the map.
Dynamic Markers
The examples shown above use static marker icons. In addition, it is also possible to generate markers dynamically. In this case, size and colors can be passed. To use dynamic markers for the query results, the entry in custom.js would look as follows:
webgis.markerIcons["query_result"]["default"] = {
    url: function (i, f) {
        return webgis.baseUrl + '/rest/numbermarker/' + (i + 1);
    },
    size: function (i, f) { return [33, 41]; },
    anchor: function (i, f) { return [16, 42]; },
    popupAnchor: function (i, f) { return [0, -42]; }
 };
The URL for dynamic markers is {webgis-api-url}/rest/numbermarker or {webgis-api-url}/rest/textmarker, so for example: https://api.webgiscloud.com/rest/numbermarker. The difference between numbermarker and textmarker is that for numbermarker only numbers may be passed. For textmarker, on the other hand, text can also be passed. If the text is too long, it is truncated.
Here are some examples of calls with different properties:
Marker with a number:
https://api.webgiscloud.com/rest/numbermarker/42
Marker with a specific size (default: 33x41 px):
https://api.webgiscloud.com/rest/numbermarker/42?w=100&h=120
Warning
The value for the height must always be greater than the width!
Marker with custom colors (fill color, border color, text color as RGB hex code, 3 or 6 digits):
https://api.webgiscloud.com/rest/numbermarker/42?w=100&h=120&c=fff,f88,fcc
Examples of text markers:
https://api.webgiscloud.com/rest/textmarker/LoremIpsum?w=100&h=120&c=fff,f88,fcc&fs=22
Here, the parameter fs (font size) was also passed, specifying the text size in pixels.
Note
Markers can also be customized for dynamic content. The approach is nearly identical to the examples shown above and is explained in the next chapter. The techniques described there can also be applied to query markers.